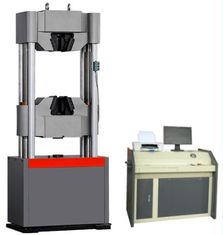
WAW-600D Computer Control Electro-Hydraulic Servo Universal Testing Machine
1. Application
The machine adopts hydraulic loading, Computer control, easy and convenient to operate. It is mainly used to execute the tension, compression, bending, flexural etc. test for metal materials. Attached with simple accessories and devices, it can be used to test wood, concrete, cement, rubber, and so on.It is very suitable for making test to different metal or nonmetal materials under high toughness and hardness against extreme big loading force.
2. Standards
ISO6892, BS4449,ASTM C39,ISO75001, ASTM A370, ASTM E4, ASTM E8 and BSEN standards.
3. Host Features
3.1 Adopts that fuel tank is mounted under the host, tensile test space is located above the host, compression, bending, shearing test space is located under the host, means between beam and worktable.
3.2 The structure is designed with solid four column and two screw, the whole machine has strong stability.
3.3 The host is designed all-inclusively to ensure its super strong stiffness so that it can resist micro-deformation when it is loading.
3.4 Middle beam adopts adjustable gap screw-nut mechanism, eliminating the gap and improving the measurement performance.
3.5 Fuel tank adopts gap sealed, improving the measurement accuracy and also extending service lifetime.
4. Overload protection
4.1 When the test force exceeds 2%-5% of the maximum test force of each file, overload protection, it will stop.
4.2 When the piston rises to the upper limit position, travel protection, pump motor will stop.
5. Main specifications
| Model |
WAW-600D |
| Structure |
6 column |
| Control way |
constant stress uniform deformation constant displacement three closed loop control and program control |
| Max.load |
600kN |
| Load accuracy |
≤±1% /≤± 0.5% |
| Load range |
2%-100%FS /0.4%-100%FS |
| Load resolution |
1/300000 |
| Deformation Measurement Range |
2%~100%FS |
| Deformation accuracy |
≤±1%/± 0.5% |
| Displacement resolution |
0.01mm |
| Displacement error |
≤±0.5% |
| Max.piston stroke |
250mm |
| Max piston moving speed |
0-50mm/min stepless speed adjusting |
| Crosshead lifting speed |
120mm/min |
| Max. tension test space |
600mm (can customize) |
| Max.Compression Test Space |
550mm (can customize) |
| Effective width |
440mm |
| Clamping method |
Hydraulic Automatic Clamp Fixture |
| Round specimen clamping range |
Φ13-Φ40 |
| Flat specimen clamping range |
0-15 (15-30 Optional) |
| Compression plate size |
φ160mm |
| Power supply |
3-phase,AC380V, 50Hz (can be customized) |
6. Configuration:
6.1. Four columns two ball screws oil cylinder down-setting high strength host---1set
* Testing machine special tensile fixture(Round Φ13-Φ40 (Φ6-Φ13,Φ40-Φ50 Optional),Flat: 0-15 (15-30 Optional))-----------------------------------------------------------------1suit
* Testing machine special bending fixture---------------------------------------------------------- 1suit
* Testing machine special compression fixture(φ160mm)--------------------------------------1suit
* Testing machine special shear fixture(Optional)-----------------------------------------------1suit


6.2. Oil source control cabinet-----------------------------------------------------------------------1set
* Italy imported Marzocchi gear meshing pump--------------------------------------------------1set
* “WNM”motor-----------------------------------------------------------------------------------------------1set
* Reversing solenoid valve for hydraulic clamp device------------------------------------------- 2pcs
* Relief valve for hydraulic clamp device--------------------------------------------------------------1 pc
* One-way valve---------------------------------------------------------------------------------------------1 pc
* Precision oil filter------------------------------------------------------------------------------------------1 pc
* Constant pressure difference send oil valve-------------------------------------------------------1 pc
* Closed type oil return valve----------------------------------------------------------------------------1 pc
* harp oil source control cabinet shell ----------------------------------------------------------------1set
6.3. specialized measure and control system--------------------------------------------------1suit
* High precision displacement testing device-------------------------------------------------------1 suit
* high accuracy sensor-----------------------------------------------------------------------------------1 pc
* YSJ50/10 high precision electronic extensometer----------------------------------------------1 pc
* Lenovo computer----------------------------------------------------------------------------------------1 set
* HPA4 color ink-jet printer------------------------------------------------------------------------------1 set
* Testing machine special measurement and control---------------------------------------------1 set
6.4 All closed protective net (Optional)-----------------------------------------------------------1suit
7. Software function and features:
7.1. Defined function: according to different types of users, different material properties, different test standards, different languages, flexible setting the test program to meet the test requirements.
7.2. Input Function: Entry specimen parameters before the test, you can single input sample parameter, you can also batch input sample parameters, you can modify the sample parameters before the test, the specimen parameters can be modified after the test, fully satisfy your operating habits.
7.3. In metal tensile test, Can automatically obtain Fel,Feh,Fp,Ft,Fm,Rel,Reh,Rp,Rt,Agt,Z,A,Rm, etc,Also can carry on the artificial recognition of for Fel, Fm, etc. and print the results accordingly. Can print different content of the report and curve according to the need.
7.4. Testing standard:The program use the open database structure, integrating national,ISO,ASTM,JIS,DIN and other test method, also can customize as request;
Can configure multiple sets of force sensor and extensometer, the user can switch at any time according to need.
7.5. Data processing query functions: fully equipped data query function, print function, the export function to ensure the accuracy of the test data, reliability, real embody and reflect the nature and characteristics of the material test data.
7.6. Curve point traversal functions: Through the mouse click on the curve of force and deformation values, to obtain various parameters of each point.
7.7. Curve selection function: force-time, deformation-time, force-deformation, force-displacement four curves can be selected according the necessity to display and print; and we can switch observation at any time, any zoom (zoom in or zoom out), move it horizontally or vertically, and high-speed sampling at real-time.
7.8. Auto saving: adopting the the database management way, the test data and curve automatically saved after the test.
7.9. Automatic analysis:Finish test, the system automatically analysis, statistical test results.
7.10. Test report: According to user required format to compile reports and can print bulk data.

Control way: contains a variety of control methods, one of these is single-step program, including many closed-loop control ways, such as constant stress, constant strain, constant displacement, displacement and force maintained etc.

 Your message must be between 20-3,000 characters!
 Please check your E-mail!
  Your message must be between 20-3,000 characters!
 Please check your E-mail!


